I talk to many loving owners who find themselves in the same position you’re in now: your senior dog is still full of heart, but their body is starting to struggle. Getting up, crossing slippery floors, climbing a few stairs, or stepping into the car isn’t as easy as it used to be. You’re probably torn between wanting to help and worrying you might accidentally hurt them—or yourself.
A well-chosen full-body support harness can change both of your lives. It gives you safe “handles” to assist your dog, and it gives your dog the security and stability they need to move with less pain and more confidence. In this guide, I’ll walk you through exactly how I evaluate and choose full-body harnesses in the rehab clinic, so you can make a practical, informed choice at home.
In this Guide
- 1 What a Full-Body Support Harness Actually Does
- 2 When a Full-Body Harness Is Better Than a Rear-Only Harness
- 3 Key Design Features I Look For in the Clinic
- 4 How I Match Harness Types to Real-World Scenarios
- 5 A Safe Fitting Routine You Can Use at Home
- 6 How to Use a Full-Body Harness Without Causing Harm
- 7 Red Flags: When the Harness You Chose Isn’t Right
- 8 Frequently Asked Questions
- 9 Final Thoughts
What a Full-Body Support Harness Actually Does
Let’s start with clear expectations. A full-body harness doesn’t magically cure arthritis, hip dysplasia, or weakness—but it does share the workload between your dog’s body and your own, in a controlled, safe way.
- Front support: The front section wraps around the chest and shoulders, helping with front-leg weakness, forelimb arthritis, or balance issues.
- Rear support: The rear piece supports hips and hindquarters, especially important in dogs with hip dysplasia, spinal disease, or rear-leg weakness.
- Connection between front and rear: When linked together, you can guide your dog’s whole body, which is crucial on stairs, ramps, or uneven ground.
- Caregiver safety: Proper handles allow you to use better body mechanics and avoid wrenching your own back or shoulders.
When chosen and used well, a full-body harness becomes a safe interface between your strength and your dog’s needs.
When a Full-Body Harness Is Better Than a Rear-Only Harness
Owners often ask if they really need the “full-body” system or if a simpler rear sling is enough. Here’s how I decide in practice:
- Both ends wobbly: If your dog is weak or unsteady in both front and rear legs, or tends to topple sideways, I reach for a full-body harness.
- Neurological issues: Dogs with spinal cord disease (like degenerative myelopathy or certain disc problems) usually do better with front and rear support.
- Stairs or steep ramps: If you must use stairs regularly, dual-point support is much safer than rear-only for many dogs.
- Heavy dogs with small caregivers: For a large dog and a smaller owner, full-body harnesses let you use your leverage more efficiently and safely.
If your dog’s only problem is mild rear weakness and they are otherwise strong and steady, a rear-only harness might be enough. But when in doubt—especially with falls or balance issues—full-body is usually the safer bet.
Key Design Features I Look For in the Clinic
Let’s talk specific features. When I evaluate harnesses for my patients, I’m very picky about a few things, because they directly impact safety and comfort.
1. Fit and Adjustability: It Must Match Your Dog’s Body
A harness that “almost” fits is a harness that will rub, slip, or fail under load. Here’s what to check:
- Multiple adjustment points: Ideally, you can adjust around the chest, behind the front legs, around the waist, and over the hips.
- Breed-type considerations: Deep-chested breeds (like Greyhounds), barrel-chested breeds (like Labs), and long-backed dogs (like Corgis) all need extra fitting attention.
- Stable, not tight: You should be able to slip two fingers under most straps, but the harness shouldn’t shift visibly when your dog walks.
It’s worth measuring carefully (chest girth, waist/hip circumference, and weight) and taking the size chart seriously. When you’re between sizes, I usually favor the one with more adjustment points and a little extra room, as long as you can snug it appropriately.
2. Padding and Pressure Distribution
Senior dogs often have bony hips, thinner skin, and painful joints. Poorly designed harnesses can create new sore spots.
- Wide belly and chest panels: These spread the load instead of digging in. I avoid narrow straps under the abdomen on larger dogs.
- Soft, breathable lining: This reduces chafing, especially behind the elbows and around the groin.
- No hard edges on sensitive areas: Buckles and adjustment sliders should not sit right on the spine, hip joints, or under the armpits.
If your dog flinches when you lift with the harness, check for pressure points. Padding and width matter more than most marketing claims.
3. Handle Placement and Length (for You)
I always evaluate harnesses from the human’s perspective too. If the handles force you into a deep forward bend every time, your own body will suffer.
- Handles near center of mass: Front handles should be roughly over the shoulders; rear handles over the hips, not too far back on the tail.
- Optional longer straps: Some systems include detachable long handles or shoulder straps so you can stay upright while assisting.
- Comfortable grip: Padded or rounded handles reduce hand fatigue during longer walks or rehab sessions.
In the clinic, I literally have owners “rehearse” lifting to see if they can do it without back strain. Don’t skip this test at home.
4. Ease of Putting On and Taking Off
Every extra buckle is extra handling on a dog who may already be sore or anxious.
- Can it go on while lying down? This is vital for dogs who struggle to stand.
- Step-in vs wrap-around: Many seniors tolerate wrap-around designs better, because they don’t need to lift their legs as high.
- Clear orientation: You shouldn’t have to wrestle or guess which strap goes where every time.
Your dog’s body doesn’t need more wrestling matches. A harness that is simple and routine to put on is much more likely to be used consistently—and that’s what helps.
5. Durability and Washability
In real life, harnesses get dirty, damp, and heavily used.
- Strong stitching and hardware: I want reinforced seams at stress points and sturdy buckles that don’t feel flimsy.
- Washable materials: Ideally, you can hand-wash or machine-wash (in a bag) and air dry to keep things hygienic.
- Rust-resistant metal parts: Important if you use the harness outdoors in all weather.
Assume you’ll be using this daily; choose accordingly.
How I Match Harness Types to Real-World Scenarios
Here’s how I think through harness choices with actual clients, which you can mirror at home.
Scenario A: Stairs Are Unavoidable
If you live in a multi-story home or apartment where stairs are part of daily life:
- I strongly prefer full-body harnesses—one handle over the shoulders, one over the hips.
- I teach owners to stand slightly to the side and behind, using both handles to keep the dog level and controlled.
- We pair the harness with non-slip stair treads or a carpet runner if possible.
Scenario B: Car Access Is the Main Issue
For dogs who mainly struggle getting into and out of the car:
- I almost always combine a ramp with a harness. The harness gives stability, the ramp protects joints.
- Rear-only or full-body can work depending on front-leg strength; full-body gives more control for tall SUVs.
- We practice on a low step first before going straight to the car, to build confidence.
Scenario C: General Weakness, Slippery Floors, “Wobbly” Dog
When I see a dog who is generally unsteady even on level ground:
- I treat the full-body harness as a “walking spotter” rather than just a lifting tool.
- We use it in combination with rugs, non-slip socks, and careful route planning through the home.
- Owners learn to provide light fingertip-level support via the handles—enough to steady, not enough to carry.
A Safe Fitting Routine You Can Use at Home
Here’s a simple step-by-step process I use in the clinic whenever we fit a new full-body harness.
- Step 1 – Introduce the harness: Let your dog sniff it, reward with treats. Don’t rush to put it on immediately.
- Step 2 – Start with the front section: Place it gently over the head (if designed that way), buckle around the chest. Adjust so it’s snug but not tight.
- Step 3 – Add the rear section: Slip it under the belly while your dog is standing or lying comfortably. Buckle and adjust.
- Step 4 – Connect front and rear (if applicable): Attach any linking straps and ensure they don’t pull the front or back out of alignment.
- Step 5 – Test movement indoors: Have your dog walk a few steps on a non-slip surface, watching for twisting or rubbing.
- Step 6 – Practice gentle lifting: Try a small assist—help them up from a sit, for example—before attempting stairs or car entry.
If something feels off (your dog freezes, flinches, or the harness shifts), stop and adjust. Minor tweaks can make a big difference.
How to Use a Full-Body Harness Without Causing Harm
Using the harness is just as important as choosing the right one. A few principles I emphasize with every family:
- Assist, don’t carry: Let your dog use whatever strength they still have; your hands are there to reduce pain and prevent slips, not replace all effort.
- Lift smoothly: Avoid jerky movements. Think “slow elevator,” not “crane.”
- Watch your own posture: Bend at the knees, keep your back relatively straight, and use handles/straps that let you stay close to upright.
- Monitor skin and fur: Check weekly for rub marks, matting, or hair loss under the harness.
Red Flags: When the Harness You Chose Isn’t Right
Sometimes we need to admit a particular harness isn’t a good match and try a different style. Signs I look for include:
- Your dog starts avoiding you when you pick up the harness.
- New sores, redness, or hair loss under straps.
- Obvious wobble or twisting when you lift.
- You’re still bending dangerously or straining your back despite using the harness.
When that happens, it’s not your failure. It just means we adjust the tool to better fit the dog—and the human—standing in front of us.
Frequently Asked Questions
Will a full-body harness make my dog “lazy” or weaker?
Used properly, no. In fact, by reducing pain and preventing falls, a good harness usually enables more safe movement, which helps maintain muscle. The key is to support, not carry, whenever your dog can still participate.
Can my dog wear the harness all day?
I generally recommend using it during active periods—walks, potty trips, stairs, car rides—and giving your dog “skin breaks” when they’re resting. Continuous wear increases the risk of chafing and doesn’t usually add benefit.
Should I get my vet or rehab therapist involved?
Yes, if possible. A quick check-in can ensure you’re choosing the right type of harness for your dog’s specific diagnosis, and they can show you safe lifting techniques tailored to your dog’s body and your own physical limitations.
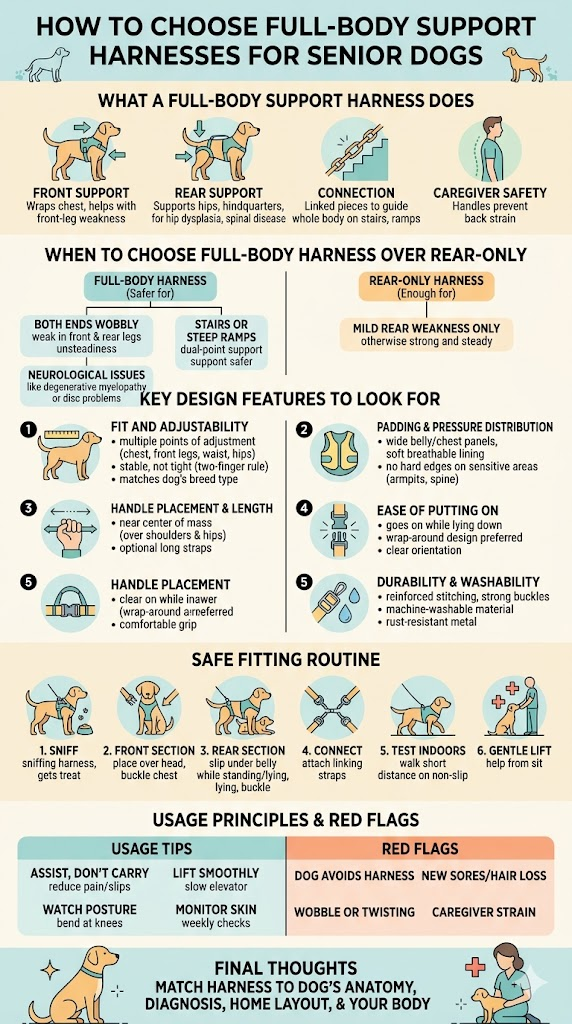
Final Thoughts
Choosing the right full-body support harness for your senior dog is less about brand names and more about thoughtful matching: matching the harness to your dog’s anatomy, their diagnosis, your home layout, and your own body. When those pieces line up, a good harness becomes more than equipment—it becomes a quiet partner in your dog’s daily life, allowing them to keep doing the things they love, safely and with less pain.
If you feel overwhelmed, remember: you don’t have to get it perfect on the first try. Start with the principles here, be willing to adjust, and most importantly, keep listening to what your dog’s body and behavior are telling you. That combination—good information and close observation—is exactly what we rely on in rehab practice, and it will serve you well at home, too.